You don't have to draw a world from scratch. Install a map someone already made, then reshape the borders, rename places and add your own factions and armies. Every step below has a screenshot.
The map editor works best on a computer: drawing regions and dragging markers want a mouse.
Two ways to start
- Start from a ready-made map (recommended): the gallery has plenty of finished maps, from the world wars to ancient empires and fantasy continents. Install one into your simulation and change anything. This guide follows this route.
- Draw your own: trace regions on a blank canvas, import a GeoJSON file you found online, or upload a picture and pin named places on it. Use this when nothing in the gallery is close.
Step 1
Install the Map app
Open your simulation's edit page, switch to Apps at the top and press Install App. Search for Map, find the Map app by WorldOS and press Install.
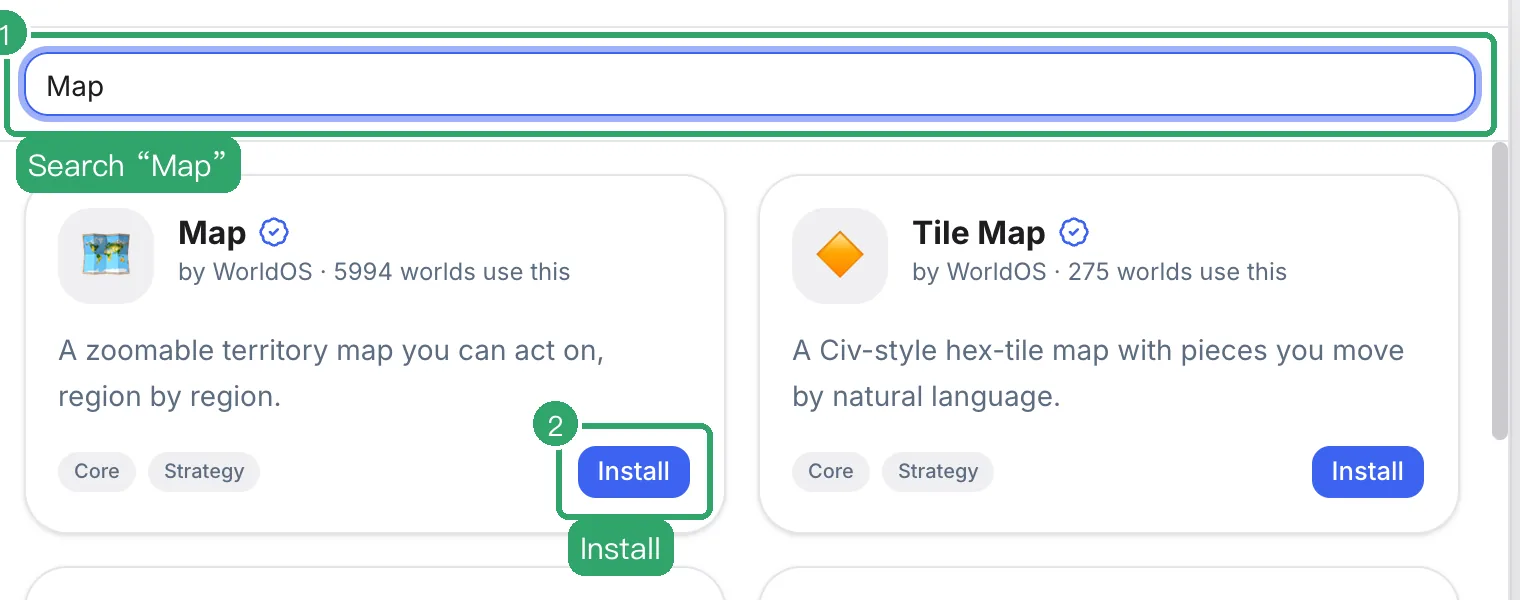
Already have a Map app? Press Configure on it under installed apps and use Replace with another map on the map card.
Step 2
Pick a ready-made map
The install panel lists maps you can use right away. Search for a period or a place and click one: its basemap, regions and factions come with it, and you can change all of them later. Place names switch to your simulation's language.
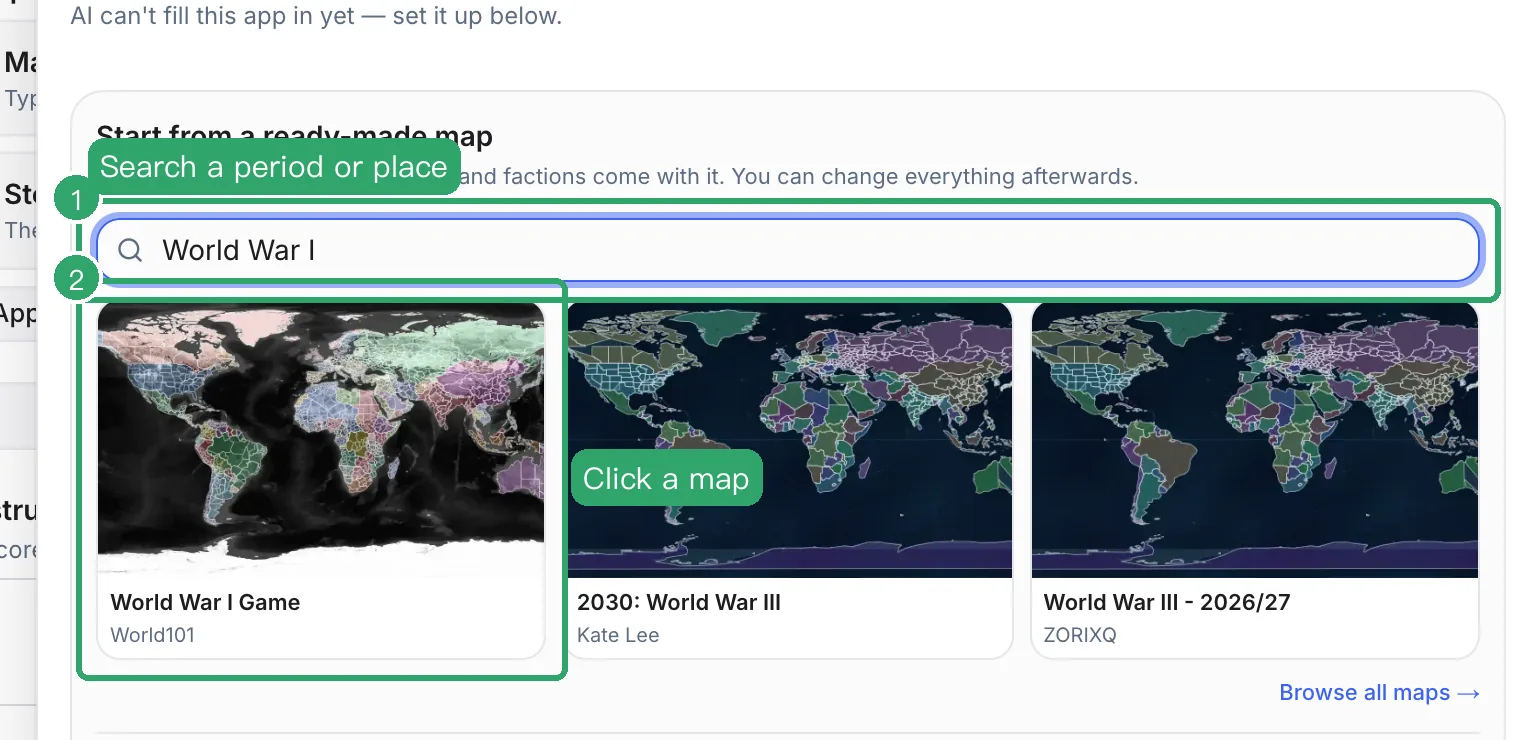
Under the list, Or start another way has three more options: upload a picture (pin map), import GeoJSON, or draw from scratch.
Pick the map whose borders are closest to your setting. Recoloring regions is fast; redrawing coastlines is slow.
Step 3
Read the map card, then install
Once you pick, the panel shows the map's card:
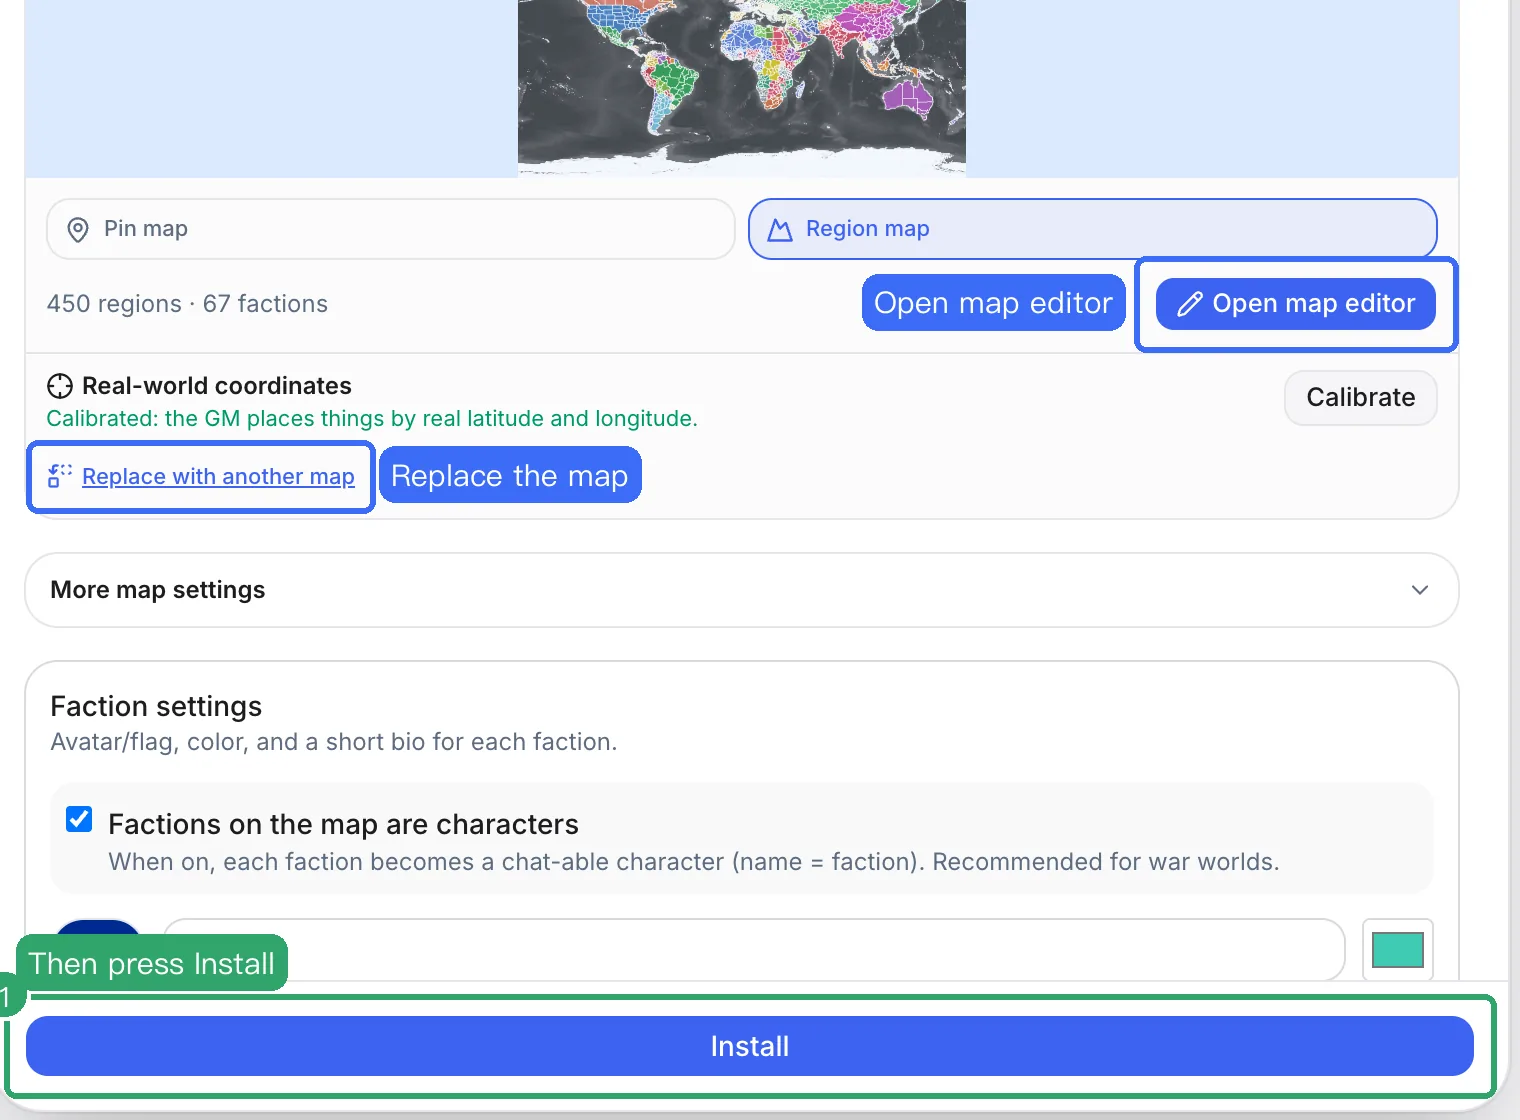
- Pin map / Region map: a region map is territories with owners, for war, strategy and country maps; a pin map is a picture with named places on it, no drawing needed.
- Open map editor: where regions, factions and markers are edited. The next steps all happen there; markers are placed and edited only in the editor.
- Real-world coordinates: whether the map is matched to real latitude and longitude. Historical maps from the gallery usually already are.
- Replace with another map: changed your mind? Pick again from here.
When it looks right, press Install at the bottom of the panel.
Step 4
Know your way around the editor
Under installed apps, press Configure on the Map app, then Open map editor. The toolbar is at the top left. From left to right:
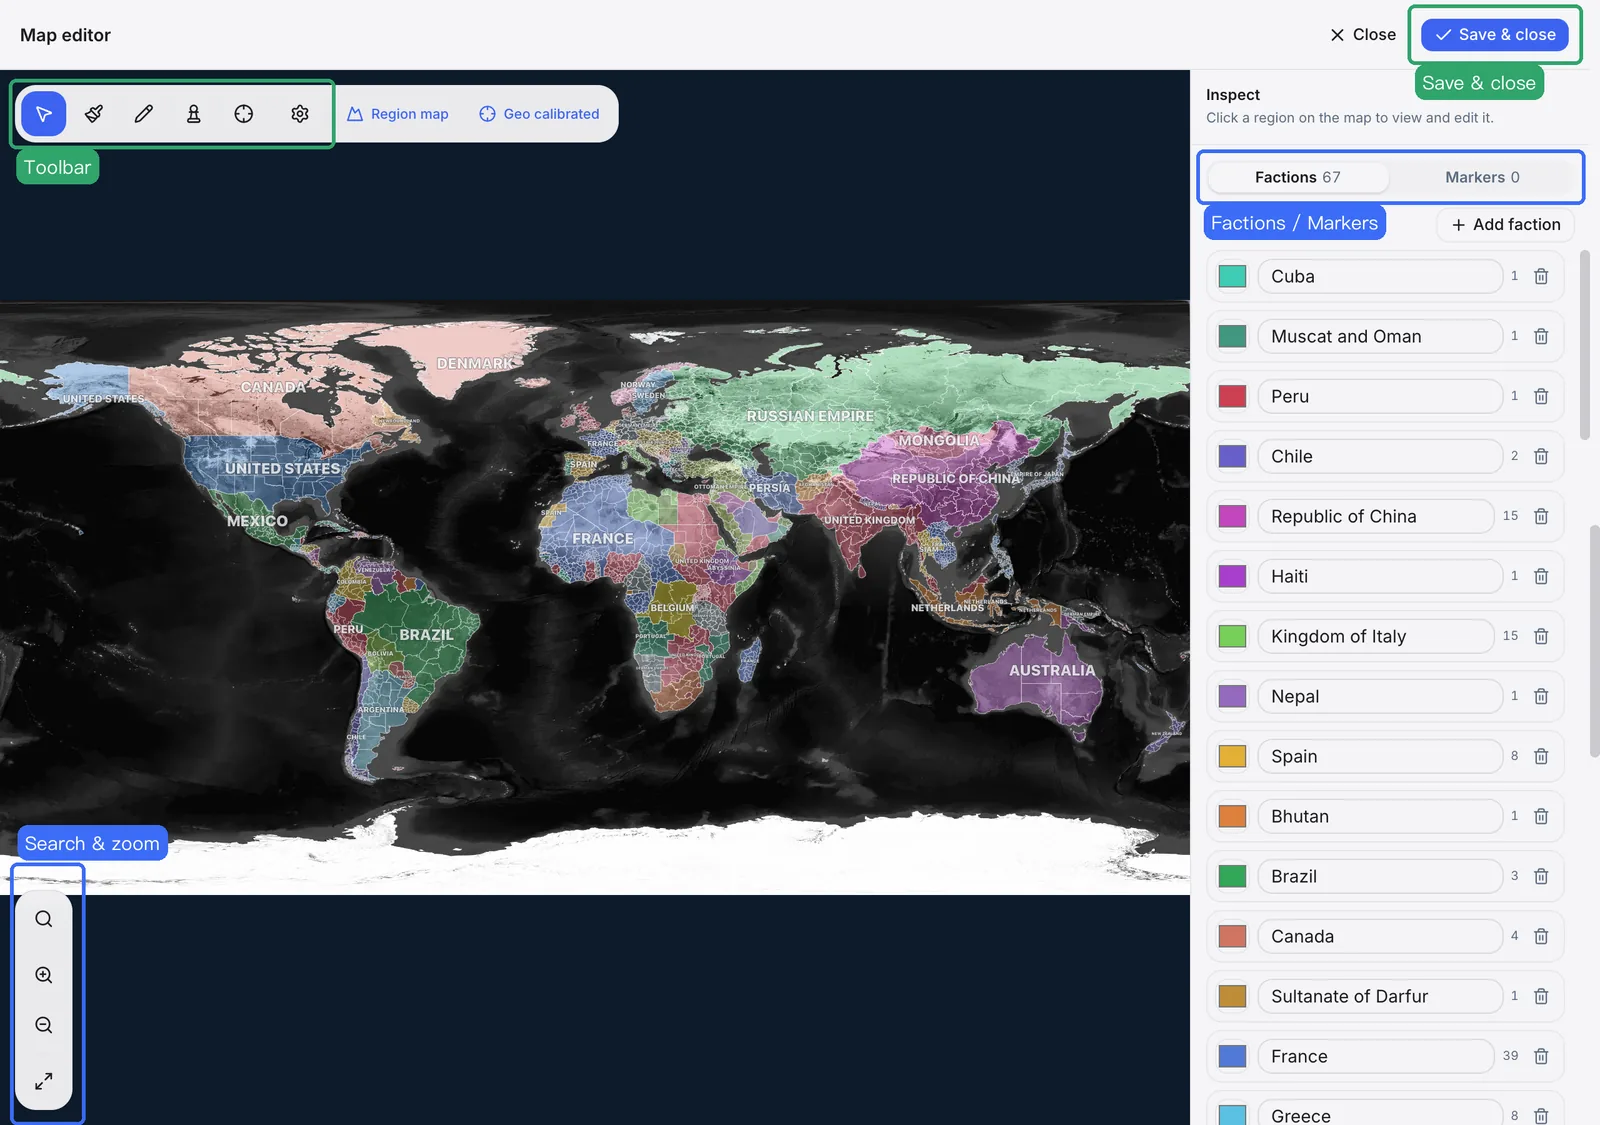
- Inspect: click a region to see and edit it.
- Paint ownership: pick a faction and click regions to hand them over.
- Draw region: trace a new territory (Add place on a pin map).
- Markers (the chess pawn): place, drag and edit markers.
- Geo calibrate (the crosshair): match the map to real latitude and longitude.
- Map settings (the gear): basemap, label size, opening camera and more.
- The two labels at the end show the map type and the calibration status; click them to switch the type or open calibration.
Bottom left: search a region by name and zoom. Right: the Factions and Markers tabs. Top right: Save & close.
Step 5
Edit a region: name, owner, interior map
Click a region with Inspect, or find it with the magnifier at the bottom left. The panel lets you:
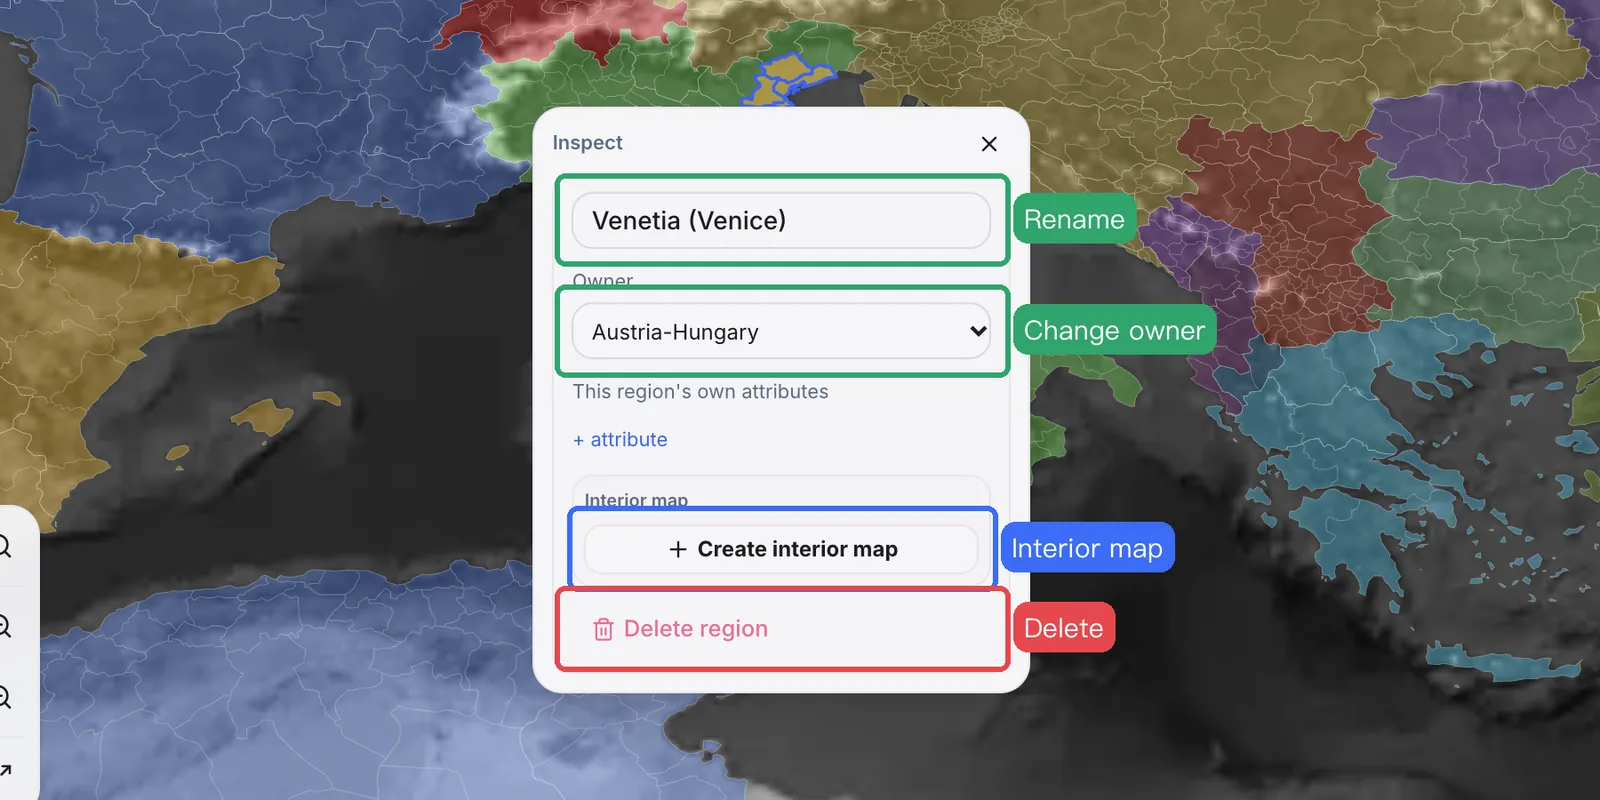
- Rename it in the box at the top.
- Change its owner from the list; Unowned means nobody holds it.
- Add attributes with + attribute — information only this region has, like Capital: yes.
- Interior map: Create interior map gives the region a more detailed map of its own, like a city's districts. Then press Edit interior to go in, and World in the path at the top to come back. Players can open it during play.
- Delete region removes it.
Names matter: the game master (the AI) reads them every turn. "Venice" tells it far more than "Region 12".
Step 6
Rename and add factions
The Factions tab on the right lists every faction: its color, its name and how many regions it holds.
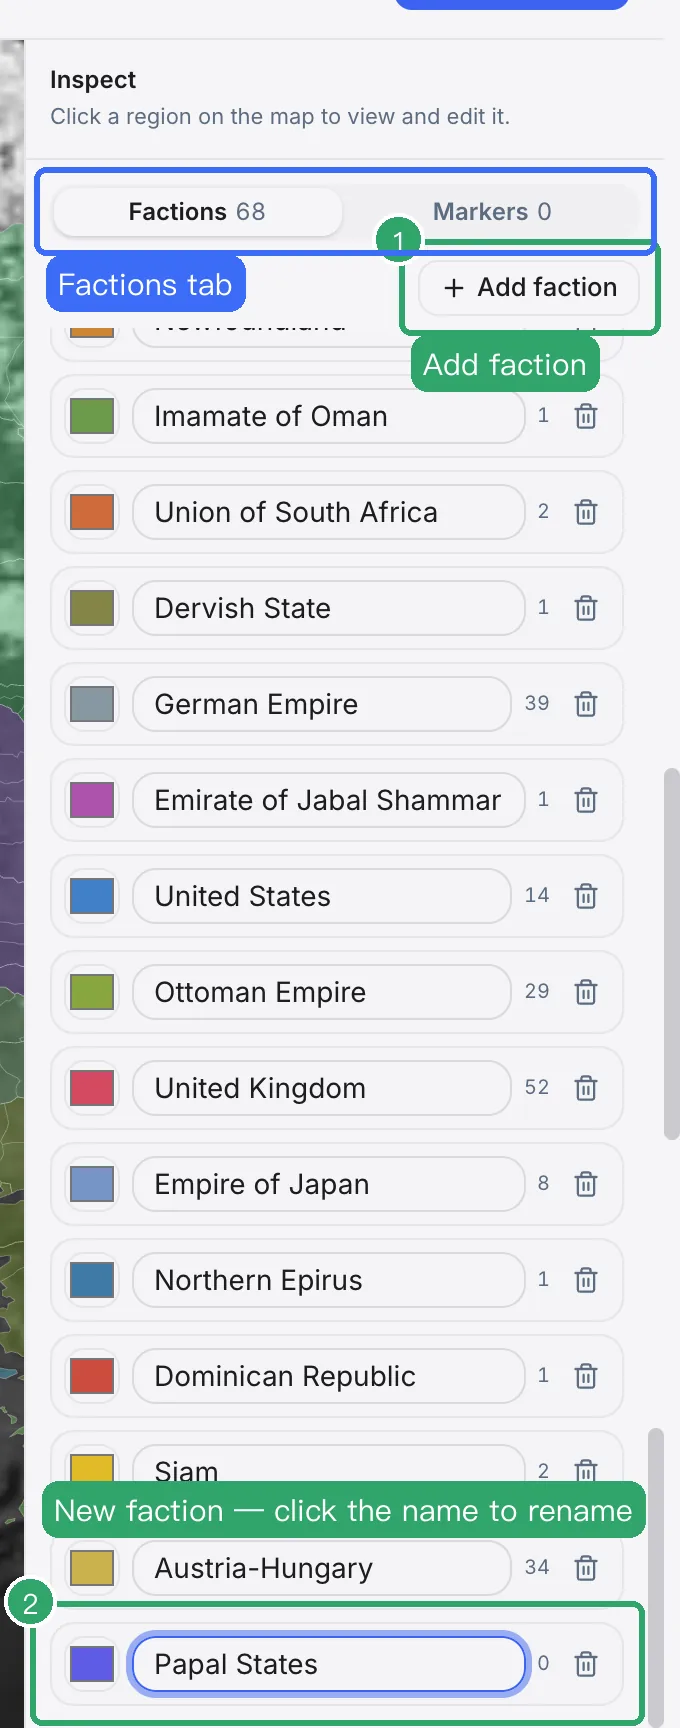
- Rename: click the name and type, e.g. turn the Kingdom of Italy into the Kingdom of Sardinia.
- Color: click the swatch on the left.
- Add: press Add faction. The new one appears at the bottom; give it a name. It holds no land yet — the next step gives it some.
- Delete: the trash icon on the right. Its regions become unowned.
Step 7
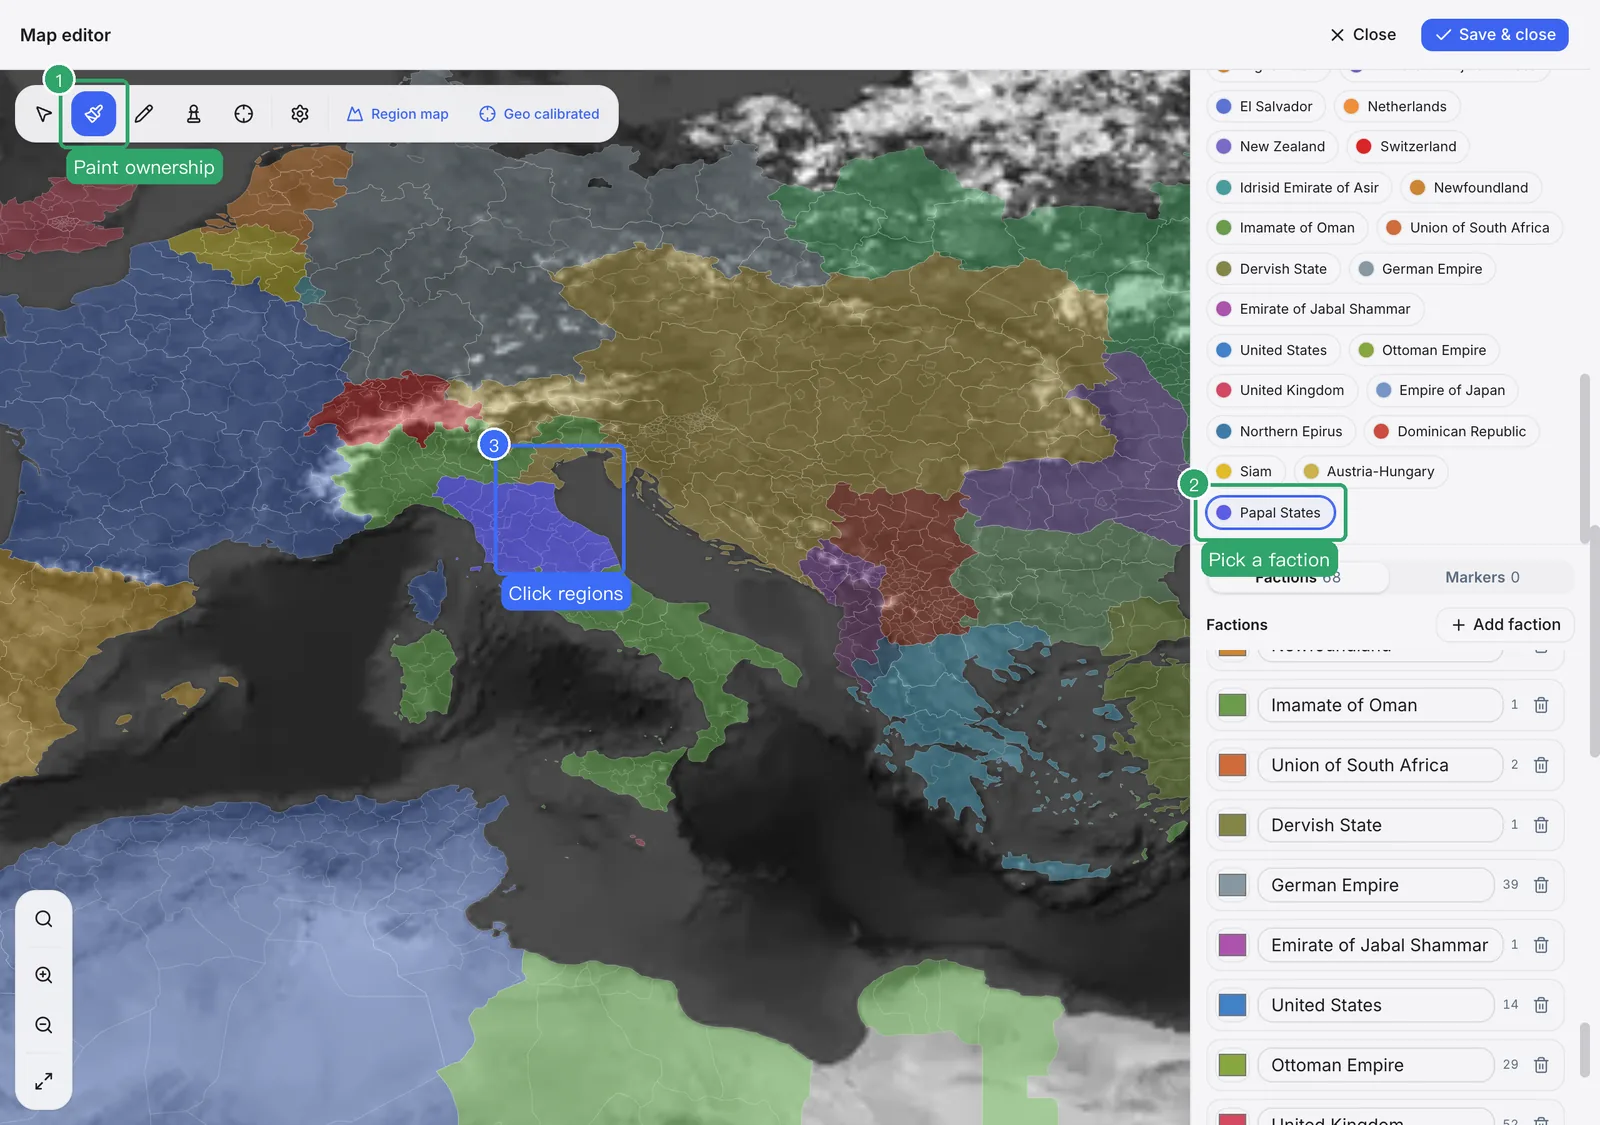
Paint regions to a faction
Choose the brush, pick a faction on the right, then click regions on the map. Each click hands that region to the faction — the fastest way to redraw a whole front.
Step 8
Draw a new region
Choose the pencil and click on the map to drop corners. Points near an existing border snap to it, so neighbors line up. Type a name and press the check mark to finish.
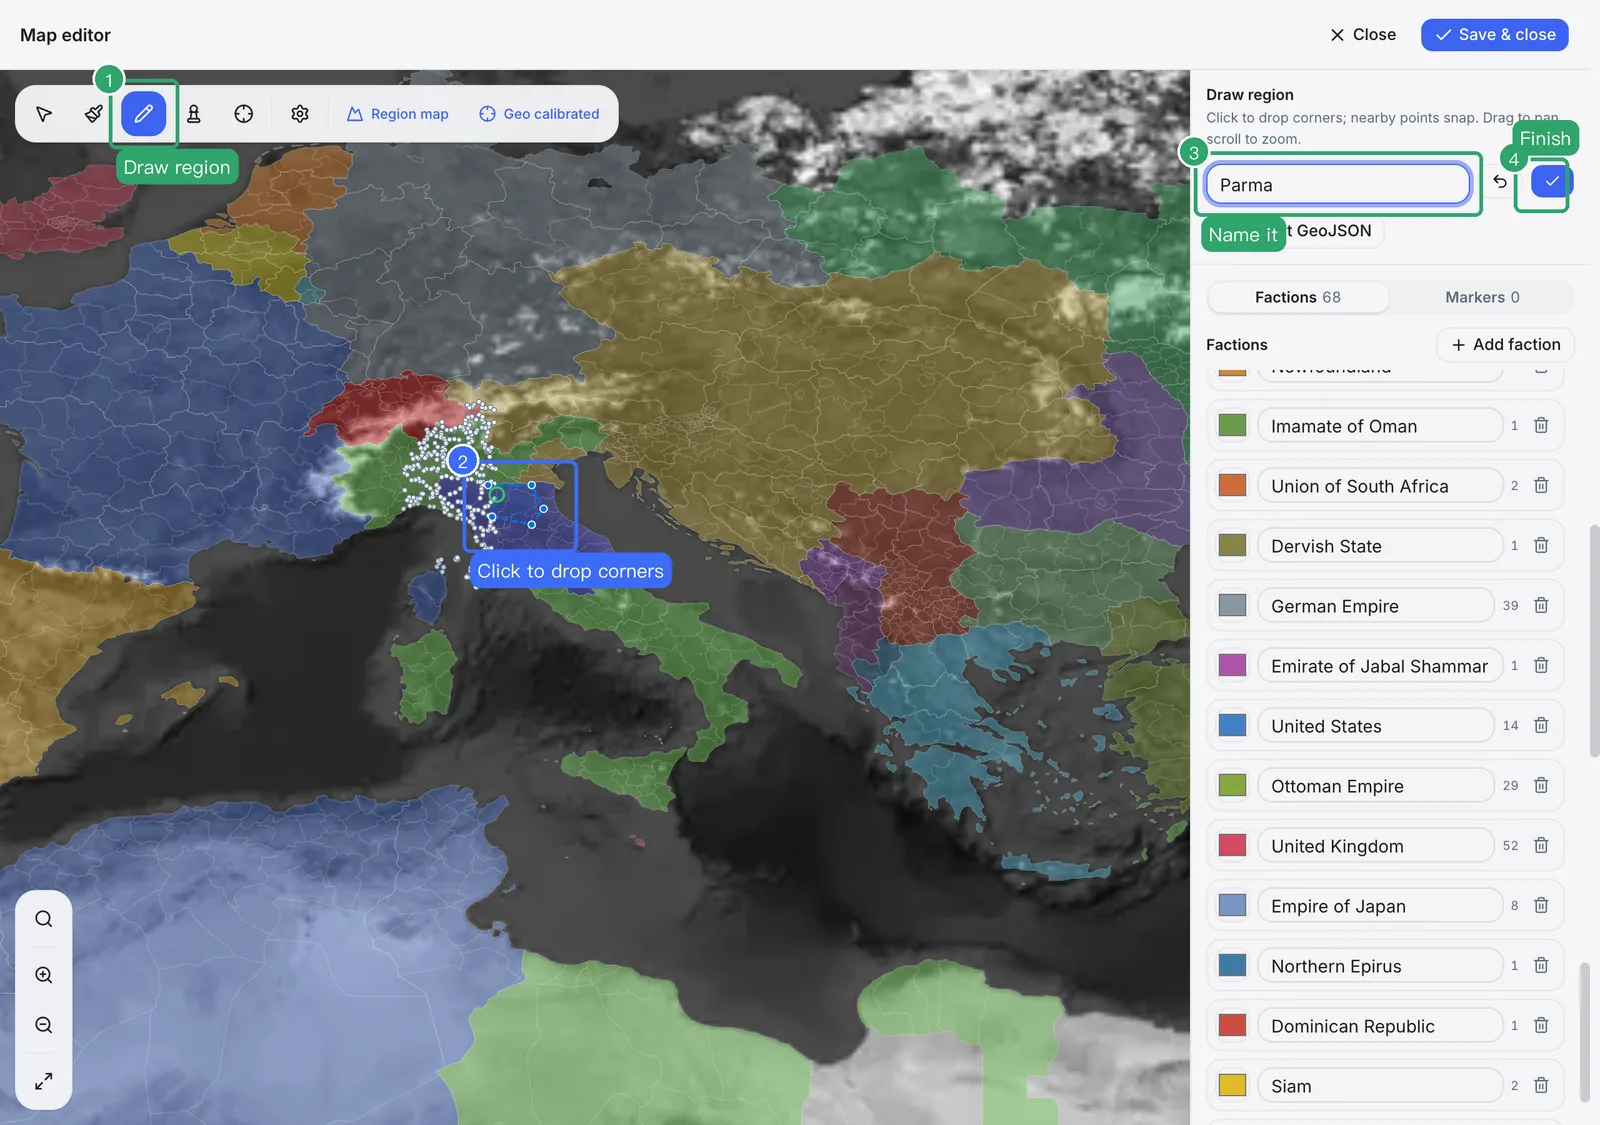
Have a GeoJSON file of historical or real borders? Import GeoJSON in Map settings turns it into regions in one go. You can find GeoJSON files online — check the license before you use one.
Step 9
Place markers
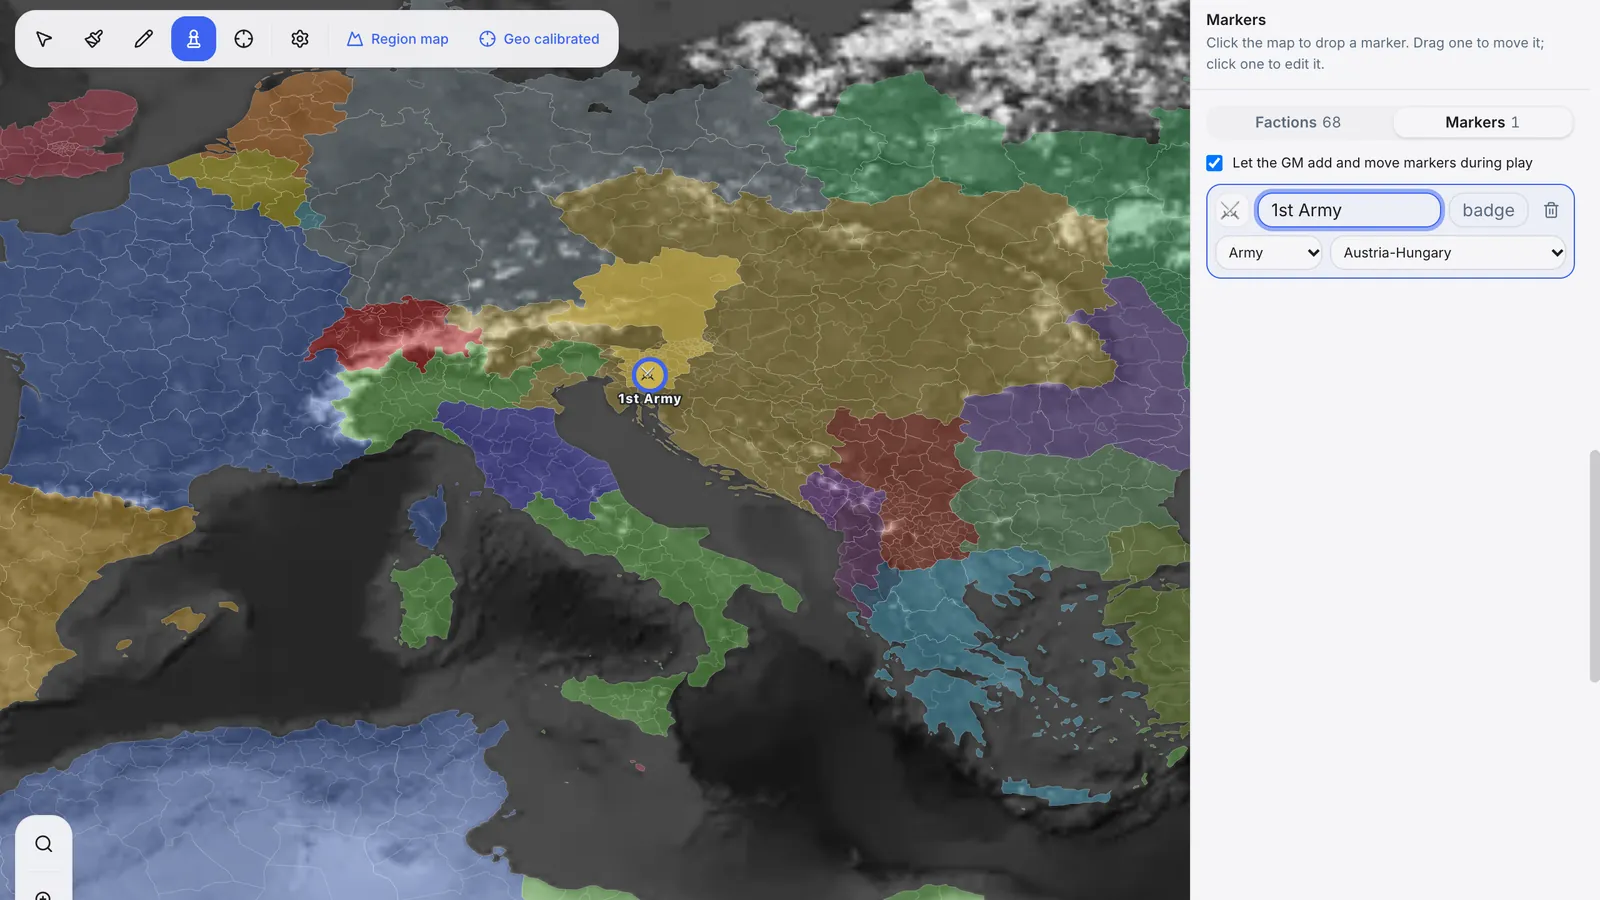
Markers are tokens that move on the map: army, cavalry, fleet, person, settlement, caravan, hazard, landmark. Choose the marker tool and click the map to drop one; drag to move it, click to edit it.
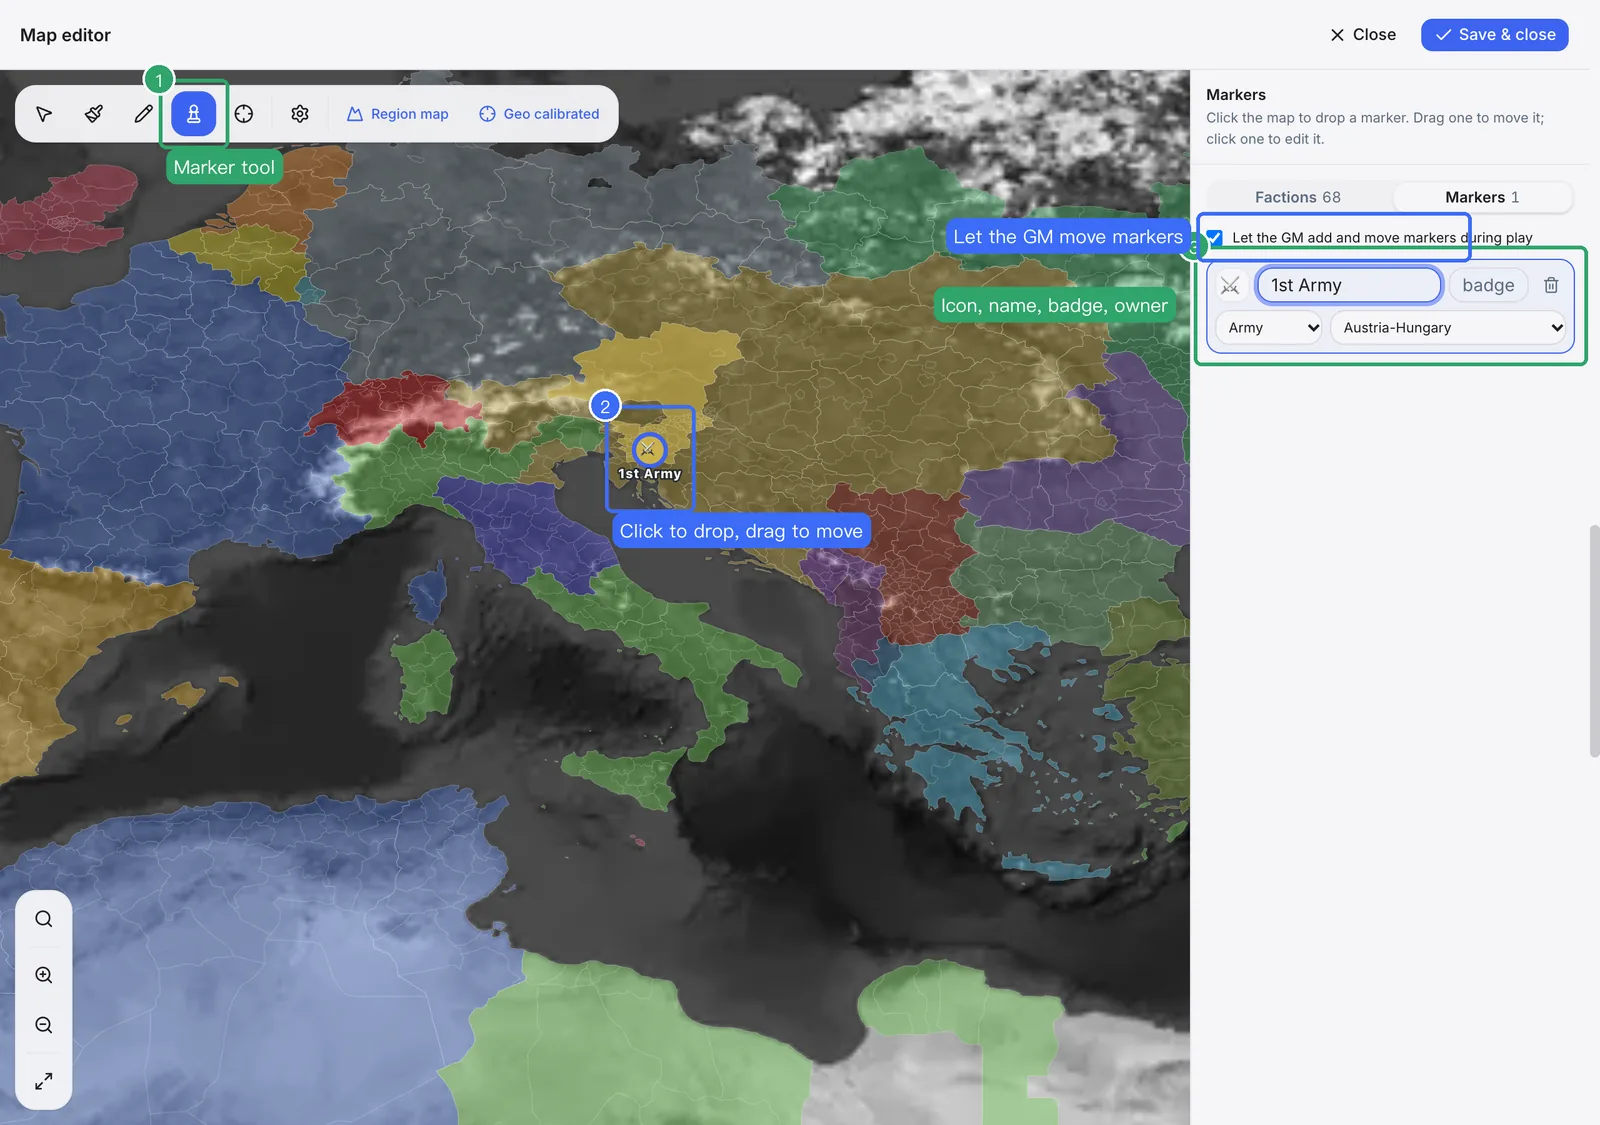
The Markers tab lists every marker, all open at once — a two-row card each, like the factions:
- First row: icon, name, badge, delete. Click the icon to open the emoji panel and pick one; the badge is small text beside the marker, like 15k or 40 ships.
- Second row: category and owner. The category sets the default icon; the owning faction sets its color.
- Click a marker on the map and the list jumps to its card and highlights it.
With Let the GM add and move markers during play (top of the tab) on, the game master moves armies, adds and removes markers as the story unfolds. It switches on by itself when you place your first marker.
These are the opening markers. You can place them on interior maps too; they show only on that layer.
Step 10
Geo calibration
Calibration tells the system which real latitude and longitude each point of the picture is. Once calibrated, the game master places markers and events by real geography, far more precisely than by guessing picture coordinates. It only matters for maps drawn to real geography; fantasy worlds can skip it.
Historical maps from the gallery usually come calibrated, and the toolbar says Geo calibrated. For a basemap you uploaded or a map you drew yourself:
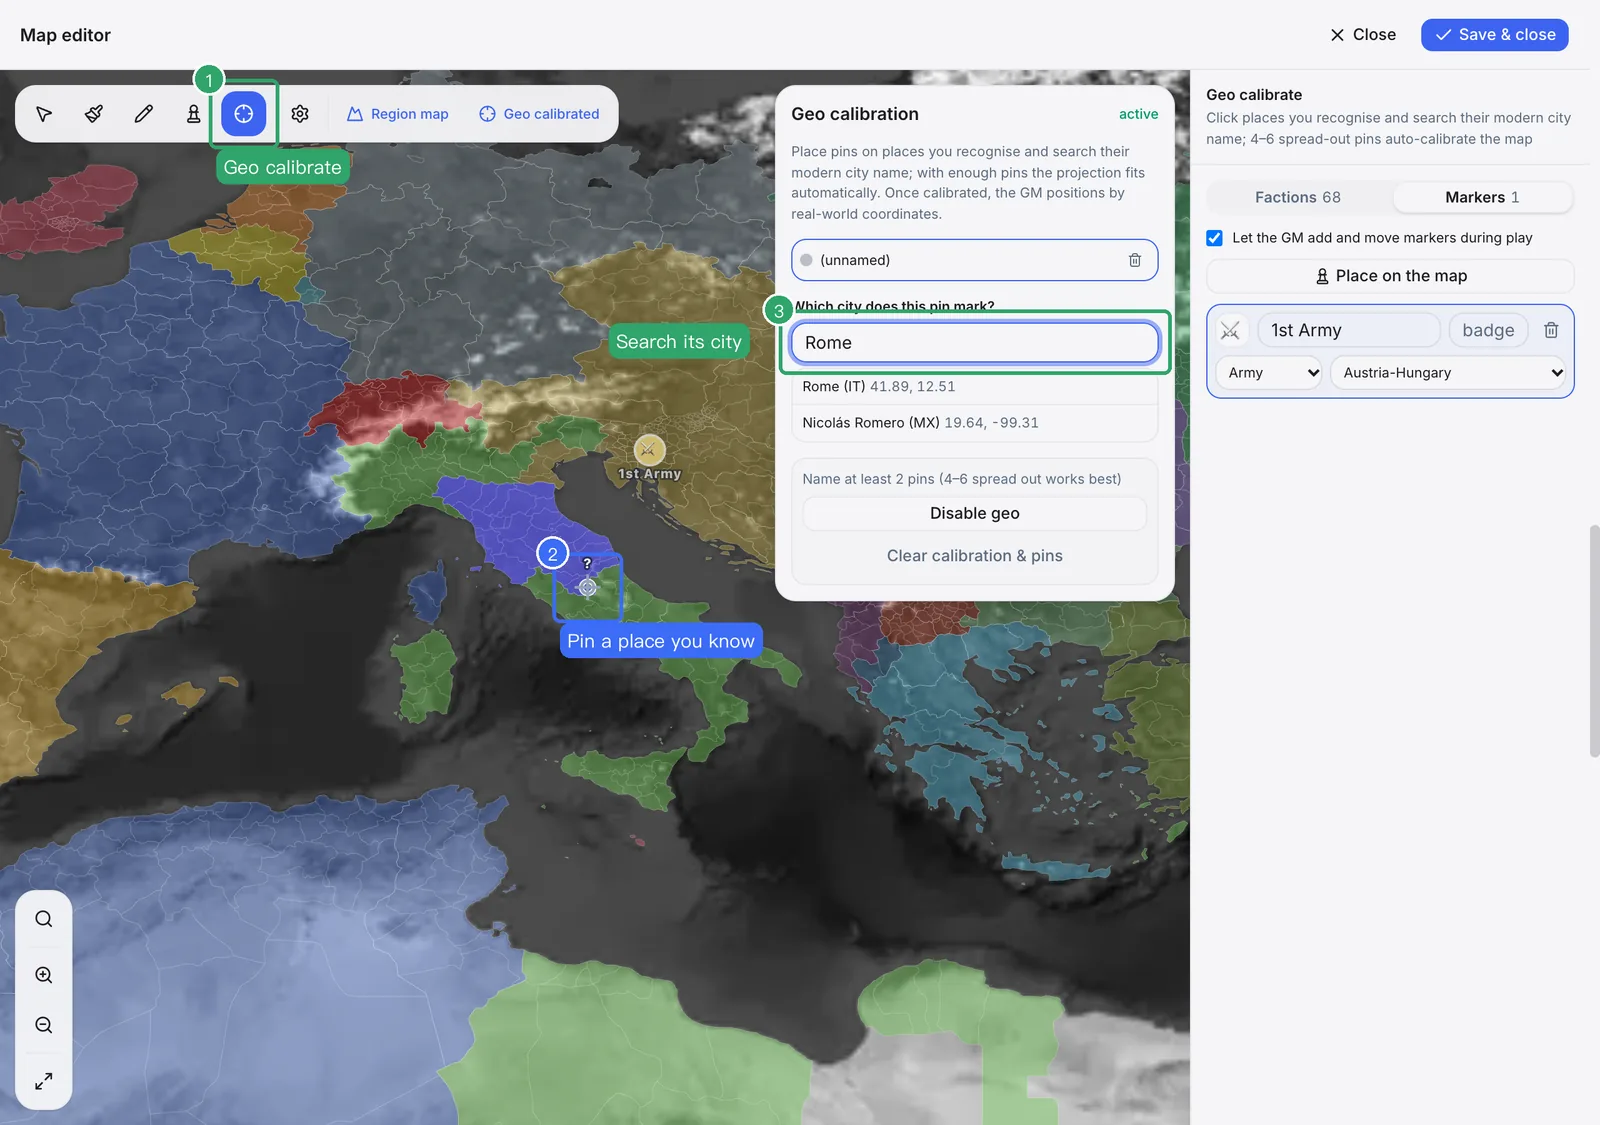
- Choose the crosshair and click a place you recognise to drop a pin.
- In the panel at the top right, search the modern city name, or type "lat, lng" directly, and pick the result.
- Repeat: at least 2 pins, 4–6 spread to the corners works best. With enough pins the projection fits itself and the panel shows the average error.
- The dashed circles on the map are well-known cities where the current calibration puts them — use them to check.
To stop using it, the bottom of the panel can disable calibration or clear it with all its pins.
Step 11
Map settings
The gear opens Map settings:
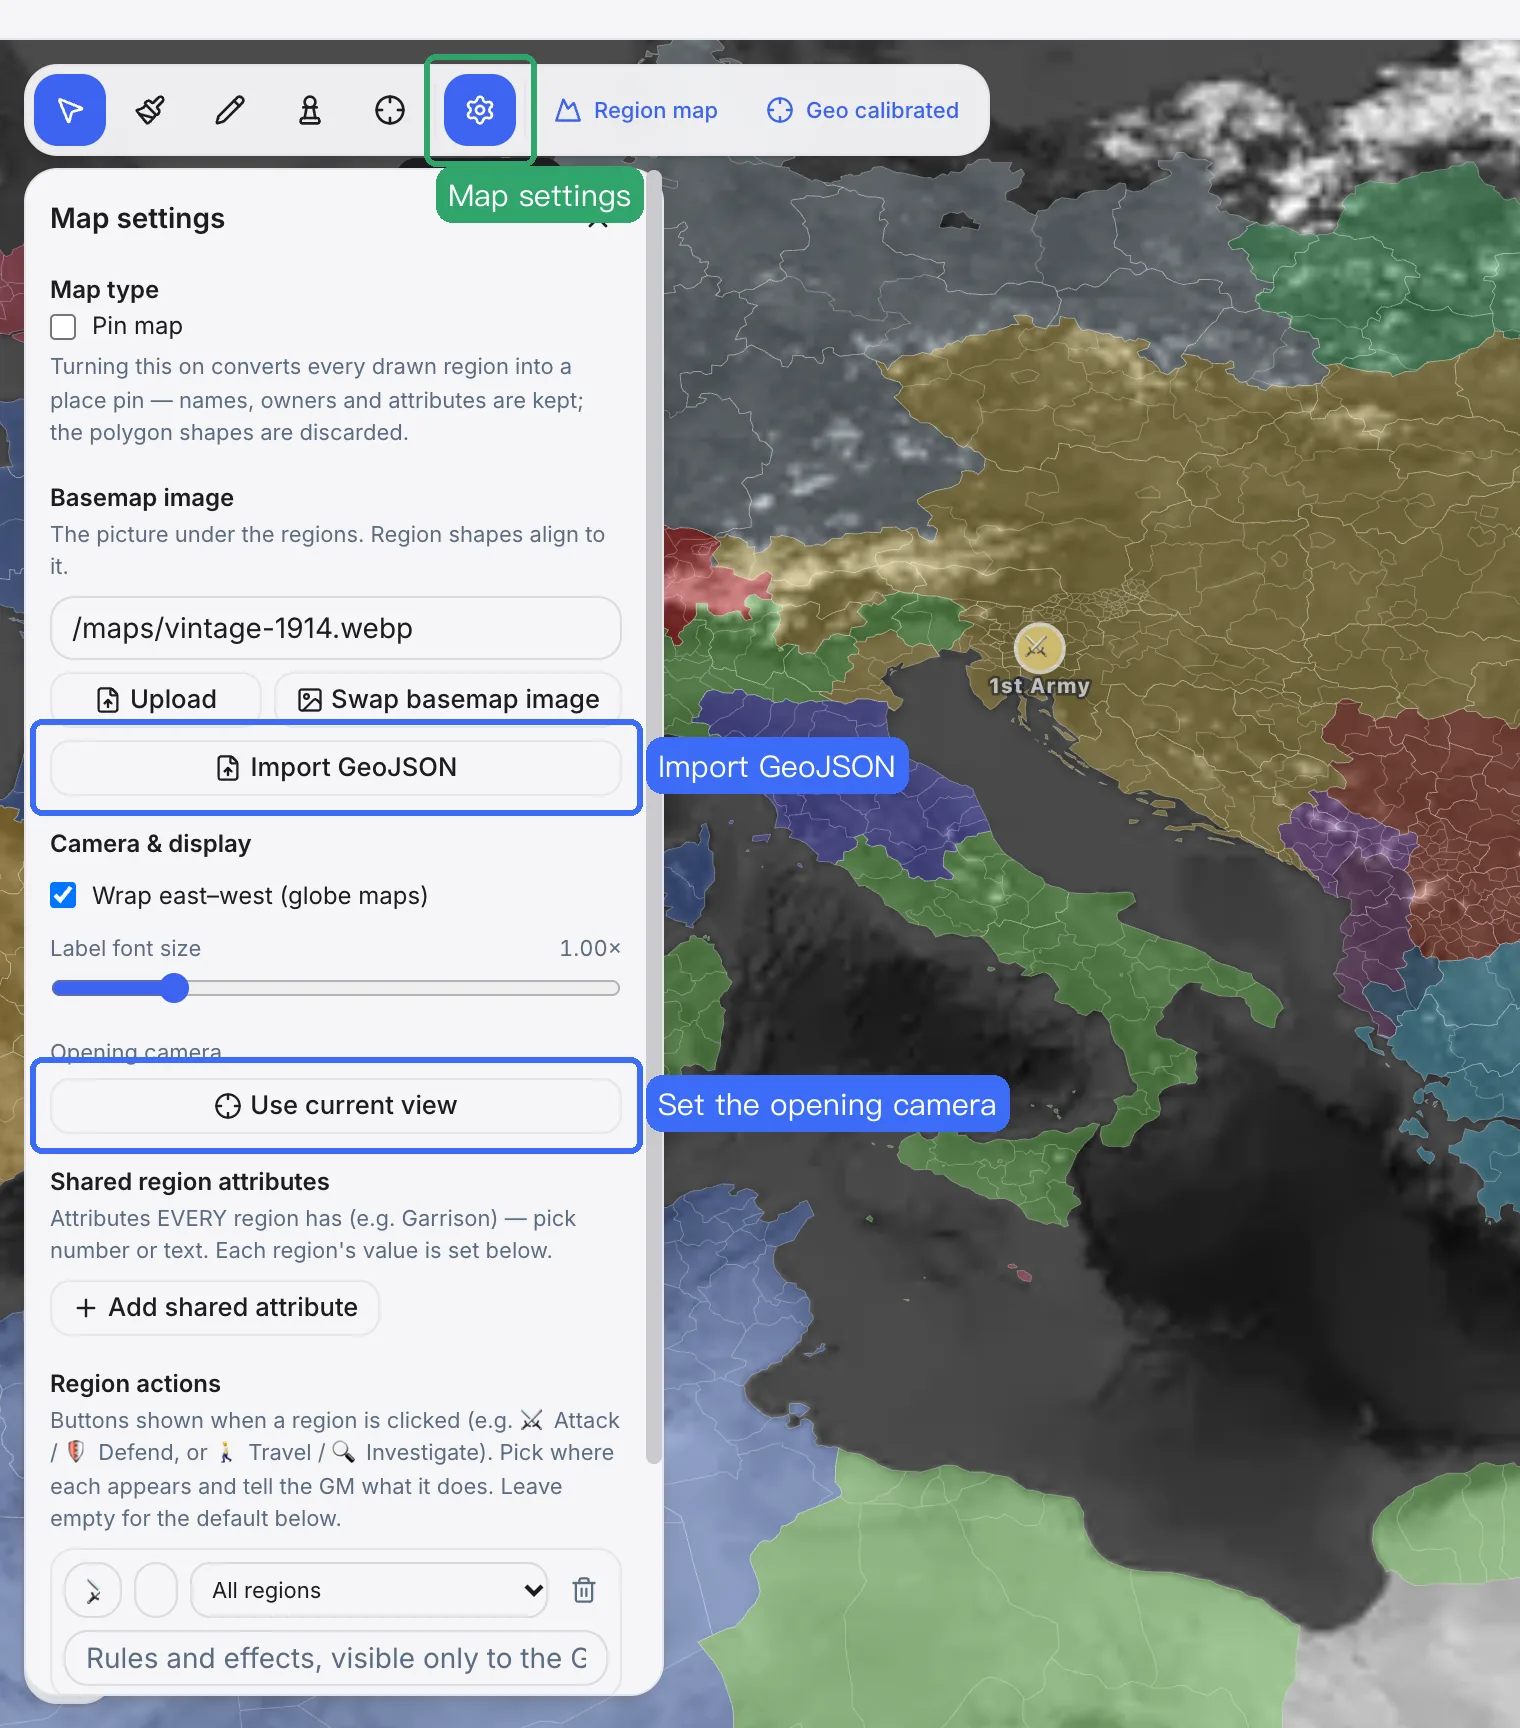
- Map type: ticking Pin map turns every region into a place pin — names, owners and attributes stay, shapes are dropped.
- Basemap image: Upload your own picture, or Swap basemap image to pick one from the library. Import GeoJSON is here too.
- Camera & display: Wrap east–west is for globe maps; Label font size scales place names; for the opening camera, frame the map the way players should first see it and press Use current view.
- Shared region attributes and region actions: the same ones as in More map settings (next step) — edit them in either place.
When you're done, press Save & close at the top right. That saves the whole Map app — nothing else to press.
Step 12
More map settings
Back in the Map app panel, open More map settings under the map card:
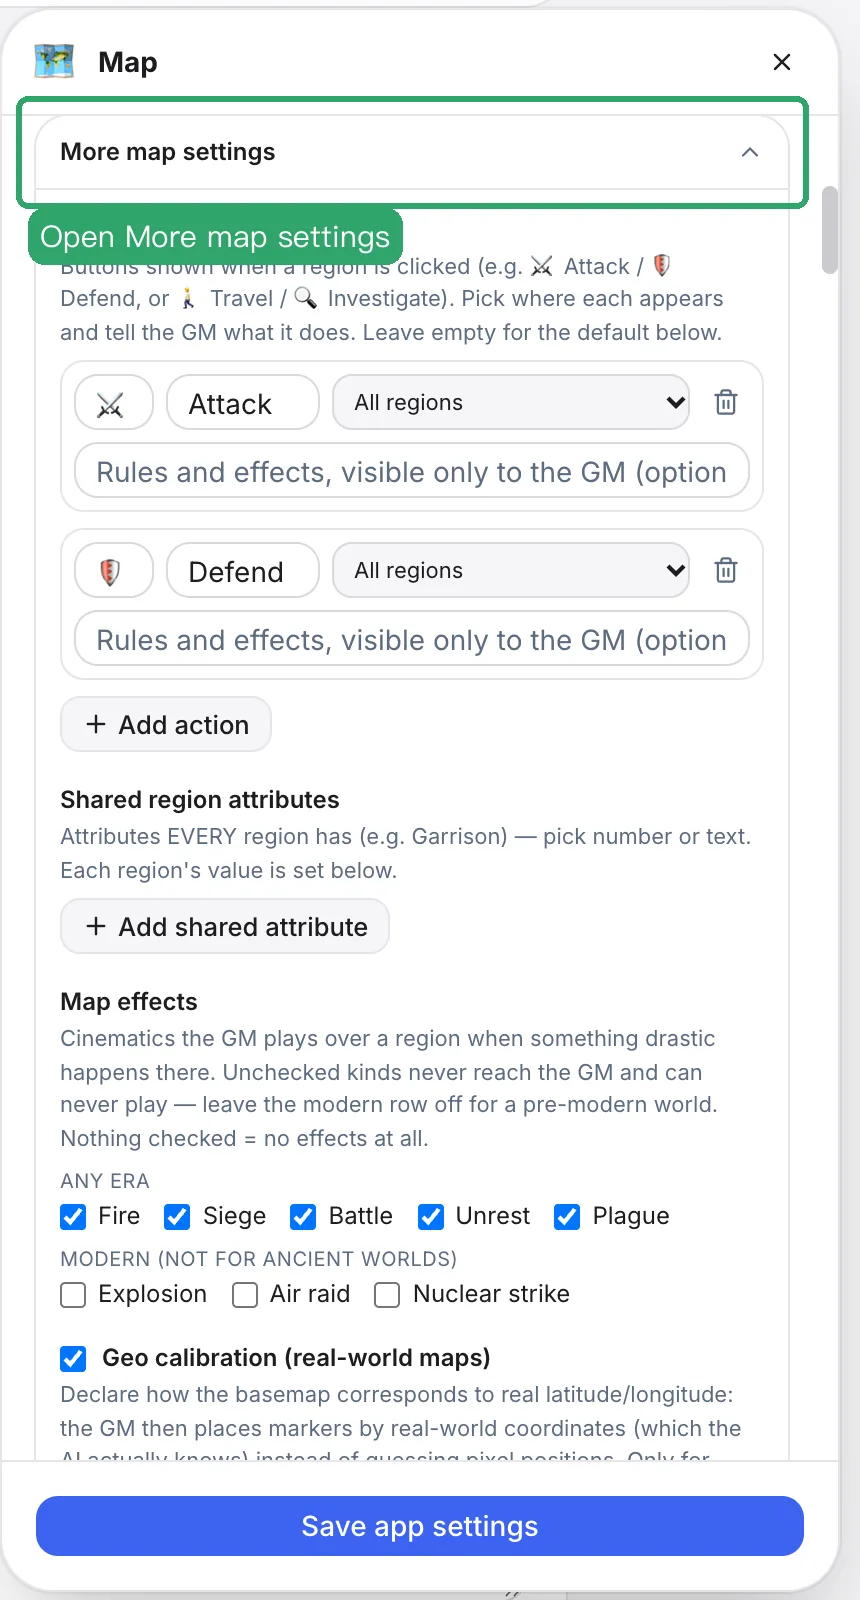
- Region actions: the buttons players see when they click a region — Attack and Defend by default. Change their icon and name, choose which regions they appear on, and add a rule only the game master sees.
- Shared region attributes: attributes every region has, like Garrison, as a number or text. Fill in each region's value in the editor.
- Map effects: the cutscenes the game master plays over a region when something big happens — fire, siege, battle, uprising, plague. Explosion, air raid and nuke are modern; leave them off in pre-modern worlds.
- Geo calibration (real-world maps): the switch behind calibration. You rarely need to type numbers here; use the Geo calibrate tool in the editor.
Step 13
Faction settings
At the bottom of the panel, Faction settings gives each faction an avatar or flag, a color and a short bio the game master reads.
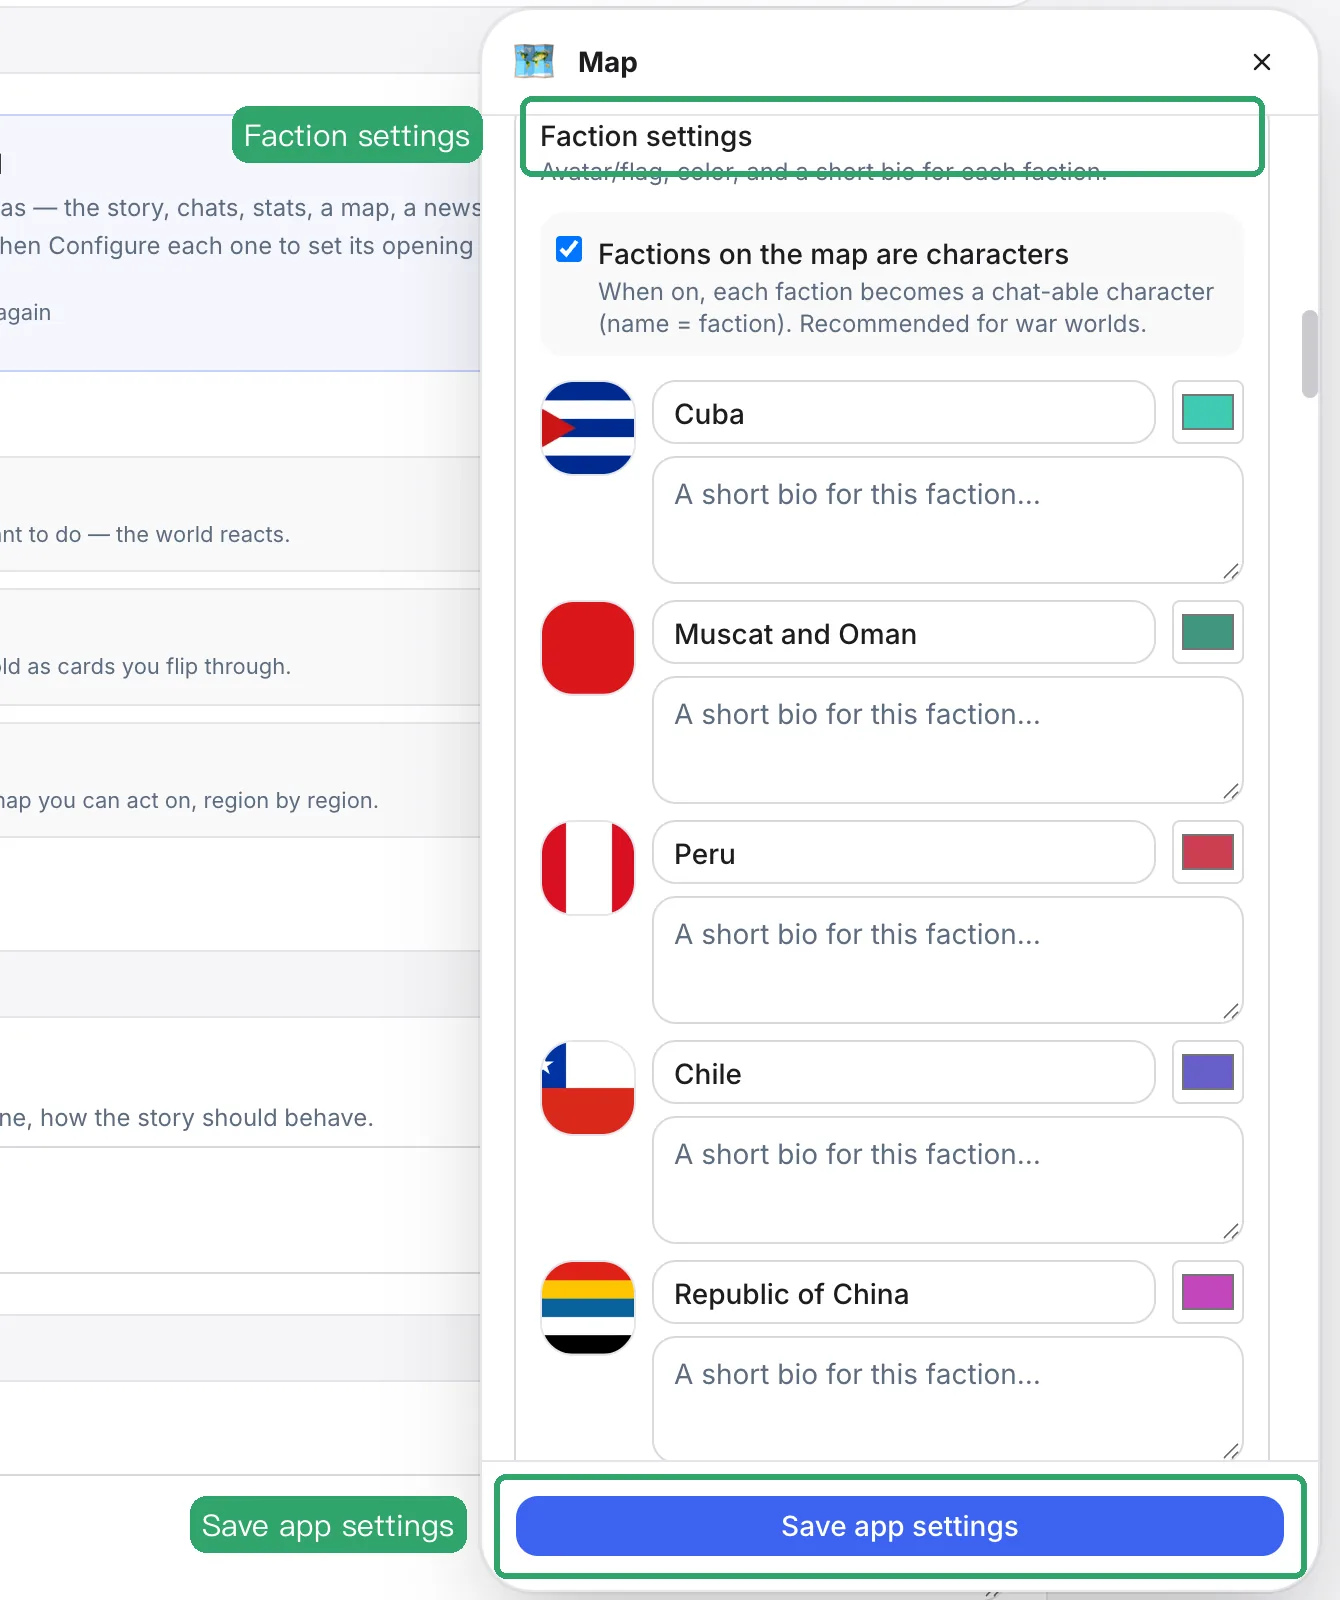
With Factions on the map are characters on, every faction becomes a character players can talk to, named after the faction. Recommended for war worlds. Then press Save app settings.
Step 14
Publish
Scroll to the bottom of the edit page and press Publish. Only a published version reaches players.
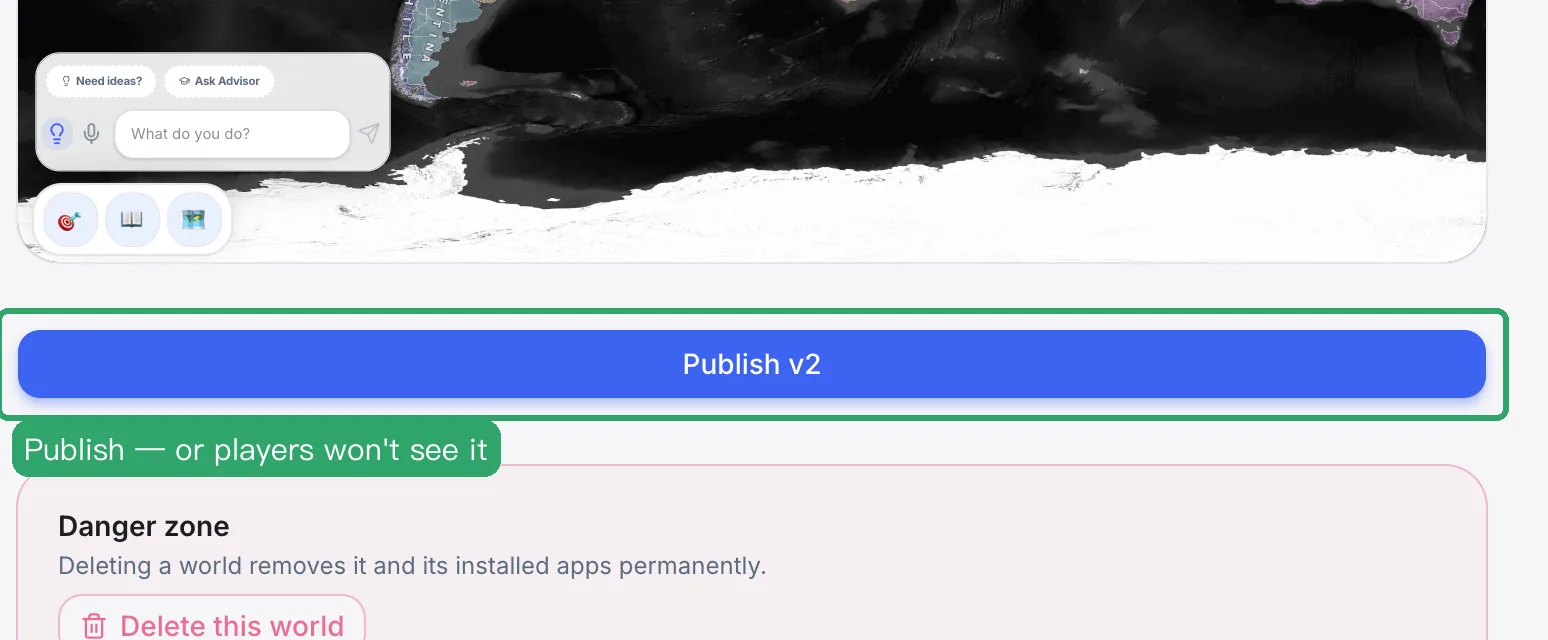
Saving keeps a draft only you can see. If you close the page without publishing, players keep getting the old map.
Another way in: the Maps gallery
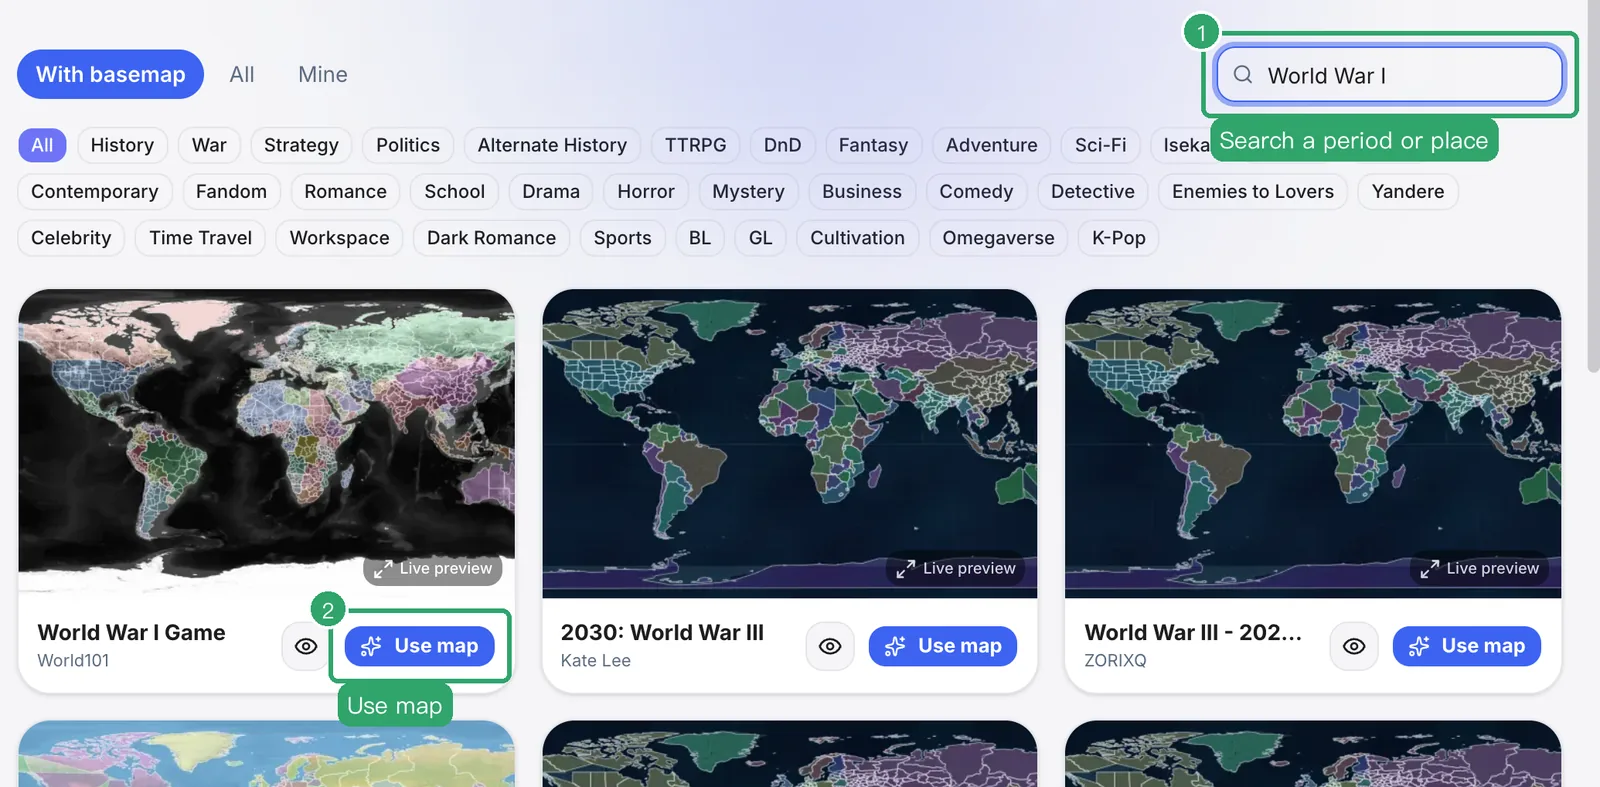
You can also browse first: open Maps in the left menu, search a period or place, click a thumbnail to preview it, then press Use map, choose the simulation, pick what to copy (Everything / Basemap / Regions) and press Install & edit.
Questions
I edited the map but players still see the old one.
You saved a draft but didn't publish. Open the edit page, scroll to the bottom and press Publish.
Will running saves get the new map?
No. A save stays on the version it started with, so a player's game never changes under them. New games, and players who upgrade their save, get the new map.
How do I remove a country I don't need?
Delete its regions (click each one → Delete region), then delete the faction with the trash icon. Or delete only the faction — its regions become unowned.
Can I use a picture instead of drawing borders?
Yes. Choose Pin map on the map card, upload your picture in Map settings and add named places with Add place.
Does the AI know about my map?
Yes. The game master reads region names, owners and attributes every turn and moves borders and markers as the story unfolds.
Does a fantasy world need geo calibration?
No. Coordinates only matter for maps drawn to real geography.
After Save & close, do I still press Save app settings?
No — Save & close saves the whole Map app. If you change something in the panel afterwards (More map settings, Faction settings), press Save app settings then.
Start your map
Create a simulation, install the Map app and start from a ready-made map.